The Ultimate Guide To Eliminating Hyphenation In InDesign
Struggling with unsightly hyphenation interrupting the flow of your InDesign documents? Fear not! We've got the solution to help you achieve seamless, professional-looking text.
Hyphenation, the automatic splitting of words across lines, can sometimes be necessary to maintain an even right margin. However, excessive or awkward hyphenation can detract from the readability and overall aesthetic of your document. InDesign provides several methods to control and eliminate hyphenation, empowering you to tailor your text to perfection.
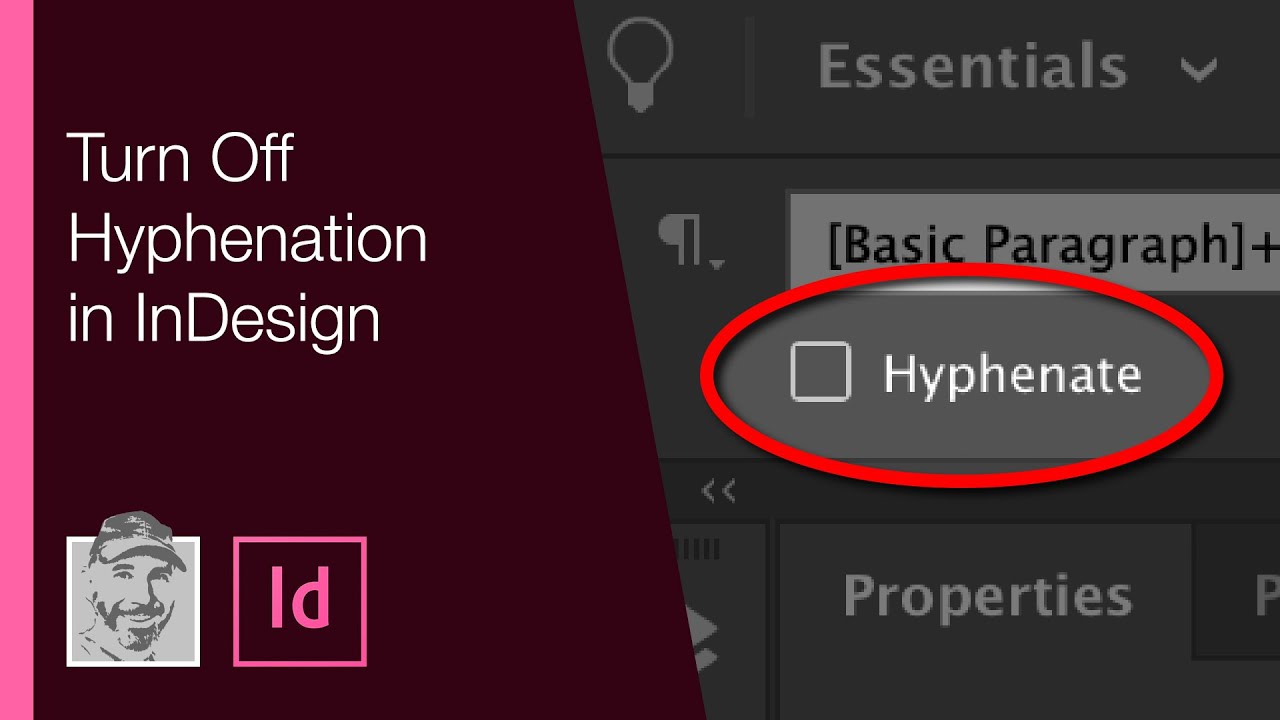
To disable hyphenation altogether, navigate to the Paragraph panel and uncheck the "Hyphenate" option. This will prevent InDesign from hyphenating any words, regardless of their length or position on the line. Alternatively, you can fine-tune hyphenation settings by adjusting the "Hyphenation Zone" and "Minimum Hyphenation Zone" values. These settings control the amount of space at the end of a line that InDesign considers available for hyphenation.
For more precise control, you can manually hyphenate specific words using the "Insert Special Character" dialog box. This allows you to determine exactly where hyphenation occurs, ensuring a consistent and polished appearance throughout your document.
By mastering these techniques, you'll gain the ability to eliminate distracting hyphenation and elevate the quality of your InDesign documents. Embrace the power of seamless text and let your ideas flow uninterrupted!
How to Get Rid of Hyphenation in InDesign
Hyphenation, the automatic splitting of words across lines, can sometimes be necessary to maintain an even right margin. However, excessive or awkward hyphenation can detract from the readability and overall aesthetic of your document. InDesign provides several methods to control and eliminate hyphenation, empowering you to tailor your text to perfection.
- Disable Hyphenation: Uncheck the "Hyphenate" option in the Paragraph panel to prevent InDesign from hyphenating any words.
- Adjust Hyphenation Zone: Control the amount of space at the end of a line that InDesign considers available for hyphenation.
- Set Minimum Hyphenation Zone: Specify the minimum number of characters that must remain on a line after hyphenation.
- Manual Hyphenation: Use the "Insert Special Character" dialog box to manually hyphenate specific words, ensuring consistent hyphenation throughout your document.
- Hyphenation Exceptions: Add words or patterns to the Hyphenation Exceptions list to prevent them from being hyphenated.
- Hyphenation Limits: Set limits on the number of consecutive lines that can be hyphenated, preventing excessive hyphenation.
- Preview Hyphenation: Use the "Show Hyphenation" option to preview how hyphenation will affect your text before applying changes.
By mastering these techniques, you'll gain the ability to eliminate distracting hyphenation and elevate the quality of your InDesign documents. Embrace the power of seamless text and let your ideas flow uninterrupted!
Disable Hyphenation
The "Disable Hyphenation" option in InDesign provides a straightforward and effective solution for eliminating hyphenation in your text. By unchecking this option in the Paragraph panel, you instruct InDesign to refrain from automatically splitting words across lines, regardless of their length or position. This method is particularly useful when you want to maintain a consistent and seamless flow of text without any interruptions caused by hyphenation.
- Complete Control: Disabling hyphenation gives you complete control over the appearance of your text, ensuring that words remain intact and unbroken.
- Improved Readability: Removing hyphenation enhances readability by eliminating potential distractions and allowing readers to focus on the content without being interrupted by mid-word breaks.
- Professional Appearance: Documents with disabled hyphenation often exude a more polished and professional appearance, as the unbroken words create a clean and cohesive visual presentation.
In addition to its benefits, disabling hyphenation can also simplify your workflow. By eliminating the need to manually adjust or correct hyphenation, you can save time and effort, allowing you to focus on other aspects of your document design.
Adjust Hyphenation Zone
The hyphenation zone plays a critical role in determining whether and where hyphenation occurs in your InDesign documents. By adjusting the hyphenation zone, you can control the amount of space that InDesign considers available for hyphenation at the end of each line. This gives you greater flexibility in managing hyphenation and achieving the desired appearance for your text.
- Fine-tuning Hyphenation: The hyphenation zone allows you to fine-tune how and where hyphenation occurs, ensuring that words are split in a logical and visually appealing manner.
- Reducing Excessive Hyphenation: By increasing the hyphenation zone, you can reduce the frequency of hyphenation, preventing excessive or awkward breaks in your text.
- Maintaining Consistent Spacing: Adjusting the hyphenation zone helps maintain consistent spacing between words, enhancing the overall readability and visual appeal of your document.
- Balancing Line Lengths: By controlling the hyphenation zone, you can influence the length of lines, creating a more balanced and visually pleasing layout.
Understanding and adjusting the hyphenation zone is essential for effectively managing hyphenation in InDesign. By manipulating this setting, you can eliminate unwanted hyphenation, improve the readability of your text, and enhance the overall aesthetic of your document.
Set Minimum Hyphenation Zone
The minimum hyphenation zone is a crucial setting in InDesign that works hand-in-hand with the hyphenation zone to control hyphenation. By specifying the minimum number of characters that must remain on a line after hyphenation, you can further refine the way InDesign splits words across lines.
- Preventing Awkward Hyphenation: Setting a minimum hyphenation zone ensures that words are not hyphenated at awkward points, such as at the end of a syllable or in the middle of a common prefix or suffix.
- Enhancing Readability: By preventing hyphenation of short words or syllables, you improve the readability of your text, as readers are less likely to stumble over hyphenated words.
- Creating Visual Balance: Setting a minimum hyphenation zone helps create a more visually balanced and appealing layout by reducing the number of hyphenated lines and distributing text more evenly.
- Consistency with Typography Rules: Many typography guidelines recommend leaving a minimum number of characters on a line after hyphenation to maintain the integrity of words and improve readability. Setting a minimum hyphenation zone in InDesign aligns with these best practices.
Understanding and adjusting the minimum hyphenation zone is essential for achieving precise control over hyphenation in InDesign. By using this setting in conjunction with the hyphenation zone, you can eliminate unwanted hyphenation, enhance the readability of your text, and create a more visually appealing and professional-looking document.
Manual Hyphenation
While automatic hyphenation can be useful in many situations, there are times when you may want to have more control over where and how hyphenation occurs in your document. This is where manual hyphenation comes in.
By manually hyphenating specific words, you can ensure that they are always hyphenated in the same way, regardless of the context in which they appear. This can be especially useful for words that are frequently hyphenated, such as compound words or words with multiple syllables.
To manually hyphenate a word, simply place the insertion point where you want the hyphen to appear and then go to Type > Insert Special Character > Hyphen. You can also use the keyboard shortcut Ctrl + Shift + - (Windows) or Command + Shift + - (Mac).
Manual hyphenation can be a valuable tool for achieving consistent and professional-looking results in your InDesign documents. By taking the time to manually hyphenate specific words, you can eliminate the risk of awkward or inconsistent hyphenation, resulting in a more polished and visually appealing document.
Hyphenation Exceptions
In the quest to eliminate unwanted hyphenation in InDesign, the Hyphenation Exceptions list serves as a powerful tool. This feature allows you to specify words or patterns that should never be hyphenated, regardless of the hyphenation settings applied to the text. This level of control is particularly valuable in maintaining the integrity of certain words or phrases.
- Preserving Compound Words: Compound words, such as "bookcase" or "high-quality," should typically remain unhyphenated to preserve their meaning and avoid confusion. Adding them to the Hyphenation Exceptions list ensures that they are always displayed as single units.
- Preventing Awkward Breaks: Certain words, such as proper nouns or technical terms, may look awkward or confusing if hyphenated. By adding them to the Hyphenation Exceptions list, you can prevent them from being broken across lines, maintaining their intended appearance.
- Maintaining Consistency: When working with multiple documents or collaborating with others, it is important to ensure consistency in hyphenation. The Hyphenation Exceptions list allows you to create a standardized list of words or patterns that should never be hyphenated, ensuring a cohesive look and feel across all your InDesign projects.
By leveraging the Hyphenation Exceptions list, you can further refine your control over hyphenation in InDesign, eliminating unwanted breaks and ensuring that your text remains clear, consistent, and visually appealing.
Hyphenation Limits
Hyphenation limits play a crucial role in preventing excessive hyphenation, which can detract from the readability and visual appeal of your InDesign documents. By setting limits on the number of consecutive lines that can be hyphenated, you can ensure that hyphenation is used sparingly and appropriately.
- Enhancing Readability: Limiting consecutive hyphenation improves readability by reducing the number of hyphenated lines, making it easier for readers to follow the flow of text without visual distractions.
- Maintaining Visual Balance: Excessive hyphenation can create an uneven and cluttered appearance on the page. Setting limits helps maintain a visually balanced layout, preventing an excessive number of hyphenated lines from disrupting the overall aesthetic.
- Adhering to Typography Best Practices: Many typography guidelines recommend limiting consecutive hyphenation to avoid creating a disjointed or choppy reading experience. Setting hyphenation limits aligns with these best practices, ensuring a polished and professional-looking document.
- Specific Control: Hyphenation limits provide specific control over the use of hyphenation. You can customize the limits based on the nature of your document, such as the font size, line length, and desired visual effect.
By understanding and utilizing hyphenation limits, you can effectively control hyphenation in your InDesign documents, resulting in improved readability, enhanced visual balance, and a more polished overall appearance.
Preview Hyphenation
In the realm of typography and document design, controlling hyphenation is paramount to achieving a polished and professional appearance. The "Preview Hyphenation" option in InDesign empowers users with the ability to visualize how hyphenation will impact their text before committing to changes, ultimately aiding in the creation of visually appealing and readable documents.
- Visualizing Hyphenation: The "Show Hyphenation" option provides a visual representation of where hyphenation will occur within the text, allowing users to assess its impact on readability and aesthetics.
- Fine-tuning Adjustments: Previewing hyphenation enables users to make informed decisions about hyphenation settings, such as the number of consecutive hyphenated lines or the minimum number of characters on a line after hyphenation, ensuring optimal results.
- Avoiding Unwanted Hyphens: By previewing hyphenation, users can identify and address potential issues, such as awkward hyphenation or excessive hyphenation, before they become permanent, contributing to a more polished final product.
- Maintaining Consistency: Previewing hyphenation promotes consistency throughout a document, ensuring that hyphenation is applied uniformly, enhancing the overall visual appeal and readability.
The "Preview Hyphenation" option serves as a valuable tool in the arsenal of any designer or publisher, enabling them to make informed decisions about hyphenation and achieve the desired visual impact in their InDesign documents.
Frequently Asked Questions on Eliminating Hyphenation in InDesign
This section addresses common queries and misconceptions surrounding the topic of eliminating hyphenation in InDesign, providing concise and informative answers to guide users in achieving their desired results.
Question 1: How do I disable hyphenation completely in InDesign?
To disable hyphenation entirely, uncheck the "Hyphenate" option within the Paragraph panel.
Question 2: What is the purpose of the Hyphenation Zone setting?
The Hyphenation Zone determines the amount of space at the end of a line where InDesign considers hyphenation. Adjusting this setting allows for fine-tuning of hyphenation behavior.
Question 3: How can I prevent awkward hyphenation at the end of syllables?
To avoid awkward hyphenation, increase the Minimum Hyphenation Zone value. This ensures that a sufficient number of characters remain on a line after hyphenation.
Question 4: Is it possible to manually hyphenate specific words in InDesign?
Yes, manual hyphenation can be achieved using the "Insert Special Character" dialog box. This method provides precise control over hyphenation.
Question 5: How do I ensure consistency in hyphenation throughout my document?
Utilizing the Hyphenation Exceptions list allows for the specification of words or patterns that should never be hyphenated, promoting consistency.
Question 6: What are the benefits of using Hyphenation Limits?
Hyphenation Limits prevent excessive hyphenation, enhancing readability and maintaining a visually balanced layout.
Summary of key takeaways or final thought: Understanding and applying these techniques will empower users to effectively eliminate unwanted hyphenation in their InDesign documents, resulting in polished and professional-looking outputs.
For further in-depth exploration of hyphenation in InDesign, refer to the comprehensive guide provided in this article.
Conclusion
Mastering the techniques outlined in this comprehensive guide empowers you to effectively eliminate unwanted hyphenation in your InDesign documents. By understanding and applying these methods, you gain the ability to control the appearance and flow of your text, ensuring polished and professional-looking outputs.
Remember, the judicious use of hyphenation can enhance readability and visual appeal. However, excessive or awkward hyphenation can detract from the overall quality of your document. By embracing the techniques discussed in this article, you can achieve a seamless and visually pleasing reading experience for your audience.
Fix: Toshiba TV Won't Turn Off With Green And Red Lights Flashing
Pituitary Hormone Guide: Explore The Hormones Of The Pituitary Glands
The Ultimate Guide To Express CORS: Enabling Cross-Origin Requests


